








7 Tips for Choosing a Thermal Conductivity Meter

Choosing the right thermal conductivity meter requires more than comparing prices or reading a product brochure. In laboratory and production settings, small measurement errors can affect insulation design, material selection, and quality decisions. A reliable instrument should match the sample type, testing method, temperature range, and required accuracy.

Practical experience shows that calibration deserves close attention. Check whether the manufacturer provides traceable standards, clear procedures, and service records. Examine how easily the meter handles powders, solids, liquids, or irregular specimens. Sample preparation can change results significantly. Surface roughness, moisture, density, and contact pressure all matter. Small details matter.

The seven tips in this guide focus on performance, usability, and long-term reliability. They cover sensor design, measurement repeatability, software clarity, temperature control, and technical support. It is also worth checking the instrument under realistic working conditions, not only during a polished demonstration. A meter may appear precise in a showroom yet become difficult to use beside a furnace or in a busy quality-control room. That possibility should not be ignored.

No single thermal conductivity meter suits every application. This is where careful judgment becomes essential. Compare published specifications with independent test evidence whenever possible. Ask how the device performs after repeated testing, cleaning, and recalibration. A lower purchase price may hide higher maintenance costs. Even experienced users can overlook this point. Careful evaluation helps create measurements that are defensible, repeatable, and useful for real engineering decisions.
7 Tips for Choosing a Thermal Conductivity Meter

Understand the Measurement Principles of Thermal Conductivity Meters

7 Tips for Choosing a Thermal Conductivity Meter

Thermal conductivity meters estimate how quickly heat moves through a material. The measurement principle matters more than the display resolution. Steady-state methods create a stable temperature gradient, then measure heat flow through the specimen. Guarded hot plate and heat flow meter systems use this approach. They work well for insulation, polymers, and other uniform materials, but testing can take time.

Transient methods apply a short heat pulse or electrical input. The instrument observes the temperature response and calculates conductivity or diffusivity. Transient hot wire methods suit liquids, powders, and some small samples. Laser flash methods mainly measure thermal diffusivity, which can be combined with density and heat capacity. Tip 1: Match the method to the sample’s shape, moisture, and expected conductivity. A method that works for dry foam may fail with a loose powder. Tip 2: Check whether the instrument measures conductivity directly or calculates it from related properties.

Good results depend on contact pressure, surface flatness, temperature stability, and calibration. I have seen small air gaps create surprisingly large errors. That detail is easy to underestimate. Tip 3: Select a meter with suitable reference materials and documented calibration procedures. Tip 4: Consider anisotropy; layered composites may conduct heat differently across and along the layers. Tip 5: Confirm the temperature range before testing. Tip 6: Review sample thickness limits and test time. Tip 7: Repeat measurements at least three times, because one clean-looking result can still be misleading.

7 Tips for Choosing a Thermal Conductivity Meter

Understand the Measurement Principles of Thermal Conductivity Meters

The chart shows representative thermal conductivity values for common materials near room temperature. A meter should be selected according to the expected conductivity range, sample form, temperature conditions, required accuracy, and measurement principle. Values are approximate because moisture, density, purity, porosity, grain direction, and temperature can significantly affect results.

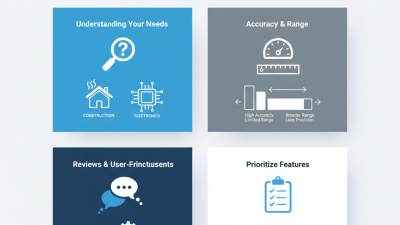
Seven Practical Selection Tips

  1. Match the instrument's measuring range to the expected conductivity of the sample.
  2. Choose a guarded hot plate or heat flow meter for stable measurements of flat, solid insulation materials.
  3. Consider transient hot-wire or transient plane-source methods for faster testing and smaller specimens.
  4. Check whether the sample is a solid, powder, liquid, film, or anisotropic material.
  5. Review the required temperature range because conductivity changes with temperature.
  6. Confirm sample-size, surface-flatness, contact-pressure, and preparation requirements.
  7. Verify calibration traceability, repeatability, uncertainty, and compliance with relevant test standards.

Match the Meter Type to Your Material and Testing Conditions

7 Tips for Choosing a Thermal Conductivity Meter

Match the meter type to your material and testing conditions. A solid sample may suit a guarded heat flow meter, while loose powder needs controlled packing. Liquids often require a transient probe, especially when convection can distort results. Check the expected conductivity range before comparing specifications. A meter should cover your real samples, not only ideal reference materials. Thin films demand a sensor designed for small thicknesses. Otherwise, contact resistance may dominate the reading.

Consider sample size, temperature, moisture, and surface finish. Rough surfaces need steady pressure and careful interface preparation. Wet materials can change during testing, so record moisture and conditioning time. For high-temperature work, confirm the sensor’s operating limit and calibration method. Use certified reference materials when accuracy matters. My early tests sometimes blamed the instrument, although uneven sample packing caused the variation. That mistake was expensive in time.

Ask how quickly the sample reaches thermal equilibrium. Fast measurements are useful, but unstable materials may need longer monitoring. Check whether the software records raw temperature and time data. That evidence helps during audits or method reviews. Repeat measurements on the same sample. Three consistent results are more informative than one impressive number. Keep a test log with pressure, temperature, thickness, and operator notes. No meter is perfect. A practical choice balances material behavior, test conditions, repeatability, and the limitations you can honestly control.

Check Accuracy, Measurement Range, and Calibration Requirements

Choosing a thermal conductivity meter starts with accuracy, not a crowded feature list. The International Energy Agency reported that buildings used about 30% of global final energy in 2022. Small material errors can therefore distort insulation and efficiency decisions. Ask for repeatability, reproducibility, and stated measurement uncertainty. A low quoted error is meaningless without test conditions.

Check the measurement range against your real samples. A device for polymers may not suit ceramics, foams, or dense metals. Review thermal conductivity, temperature, sample thickness, and contact-pressure limits together.

ISO 22007-2 describes transient methods that require controlled specimen contact and temperature conditions. ASTM D5470 focuses on thermal transmission properties in thermal interface materials.

These details matter. They prevent false confidence.

Calibration requirements deserve equal attention. NIST Technical Note 1297 recommends evaluating uncertainty from calibration, resolution, repeatability, and other sources. Choose traceable reference materials with certificates, assigned values, and uncertainty statements. Confirm the calibration interval before purchase. Some laboratories need verification before every test session. Others can follow a scheduled check. I still double-check fixture pressure and surface flatness, because operators often overlook them. That is not ideal. Keep raw readings, ambient temperature, sample preparation notes, and calibration records. A meter is only as reliable as the evidence behind each result.

Evaluate Sample Preparation, Testing Speed, and Ease of Operation

Choosing a thermal conductivity meter starts with the sample, not the display. The IEA’s 2023 Global Status Report for Buildings and Construction reports that buildings use about 30% of global final energy. Reliable measurements therefore matter during insulation and material development. Tip one: match the method to the material. ASTM C518 and ISO 8301 support different approaches for flat, rigid, porous, and low-conductivity samples. Tip two: control thickness and surface flatness. Uneven contact creates air gaps. Tip three: record moisture content and conditioning temperature. Moisture can change results sharply in fibrous or porous materials.

Tip four: check preparation time. A meter may read quickly, but cutting, drying, sealing, and temperature equilibration can dominate the workflow. Tip five: ask for stabilization indicators, not only a final number. Fast is not always accurate. Tip six: compare repeatability across at least three prepared specimens. One successful run proves little. I have seen a clean-looking result hide poor contact pressure. That is worth questioning.

Tip seven: evaluate daily operation. Look for clear prompts, automatic data logging, calibration reminders, and simple export options. ISO/IEC 17025 principles emphasize traceability, documented procedures, and measurement uncertainty. The best instrument will not repair careless preparation. Choose one that makes mistakes visible. Operators should change settings without guessing. A short training session is useful, yet it cannot replace a written method. Check warm-up time, sample loading effort, cleaning steps, and the number of measurements possible per shift. The practical test is simple: can two trained users prepare and measure the same sample consistently?

Compare Data Features, Durability, Support, and Total Ownership Cost

Choosing a thermal conductivity meter requires more than comparing price tags. Data features should match your materials, test temperature, and reporting needs. Check measurement range, resolution, repeatability, and sample size requirements. Confirm whether the instrument records temperature, moisture, operator ID, and calibration history. These details matter when results must survive an internal review or customer audit.

Durability is equally practical. Inspect the probe design, housing materials, cable strength, and resistance to dust or spills. A laboratory meter may not suit a busy production floor. Ask how often calibration is recommended and whether certified reference materials are available. I once overlooked cable flexibility during equipment selection. Daily handling exposed that weakness quickly. Small design choices can create large maintenance costs.

Support should include clear manuals, training, troubleshooting, and accessible technical advice. Response time matters when testing stops. Evaluate software updates, spare-part availability, and repair procedures before purchasing. Then calculate total ownership cost, including calibration, consumables, labor, downtime, and disposal. A cheaper meter may become expensive after repeated service visits. Compare the cost over five years, not one invoice. Request realistic performance data from controlled tests, rather than relying only on sales claims. Independent verification is better. Still, no meter is perfect; operator technique and sample preparation can distort results. Build training and repeat checks into your purchasing plan.

7 Tips for Choosing a Thermal Conductivity Meter - Compare Data Features, Durability, Support, and Total Ownership Cost

No. Selection Tip Data or Feature to Compare Practical Benchmark How to Verify Ownership Impact
1 Match the Measurement Method to the Material Applicable thermal-conductivity range, sample type, test geometry, and measurement method. The stated operating range should cover the expected material values with additional margin at both the low and high ends. Review the technical specification, method description, sample requirements, and published reference standards. Reduces invalid tests, adapters, repeat testing, and process delays.
2 Compare Accuracy and Repeatability Accuracy, repeatability, resolution, measurement uncertainty, and temperature stability. Prefer specifications that clearly separate accuracy from repeatability and identify test conditions, sample size, and temperature. Request test data from certified reference materials or independent verification results under conditions similar to your application. Reliable data lowers scrap, troubleshooting time, and the risk of incorrect material decisions.
3 Evaluate Temperature Control Operating temperature range, heating and cooling control, stabilization time, and temperature uniformity. The instrument should support the intended test temperature and provide a defined stabilization criterion before recording data. Check temperature-control specifications, logged temperature profiles, and available alarms or interlocks. Stable temperature control improves repeatability and prevents wasted samples caused by premature readings.
4 Check Data and Connectivity Features Automatic calculations, data storage, export formats, audit trails, user access, and connectivity. Look for time-stamped records, exportable raw data, editable test methods, and compatibility with the laboratory data workflow. Confirm whether data can be exported in common formats such as CSV or PDF and whether changes are traceable. Cuts transcription work and supports quality audits, trend analysis, and electronic recordkeeping.
5 Assess Durability and Maintenance Housing protection, probe and sensor durability, replaceable wear parts, cleaning requirements, and calibration interval. Choose a design suited to the laboratory environment, with documented preventive-maintenance procedures and readily replaceable consumables. Review service manuals, environmental limits, spare-part availability, warranty terms, and maintenance schedules. Longer service life and simpler maintenance reduce downtime and unplanned repair costs.
6 Compare Calibration and Technical Support Calibration traceability, certificate content, service response, training, software updates, and technical documentation. Calibration documentation should identify standards, methods, results, environmental conditions, and the recommended recalibration interval. Ask for a sample calibration certificate, support process, training scope, and typical service lead time. Accessible support shortens qualification time and limits production or laboratory interruptions.
7 Calculate Total Cost of Ownership Purchase price, installation, training, calibration, consumables, software, energy, repairs, downtime, and disposal. Compare the expected cost over the full planned service period rather than comparing purchase prices alone. Use: TCO = acquisition + installation + training + calibration + consumables + service + downtime − resale value. Reveals the lowest-cost option after recurring expenses and operational risks are included.
Comparison note: Performance specifications should always be interpreted together with the stated test method, sample characteristics, temperature conditions, calibration status, and measurement uncertainty. A lower purchase price does not necessarily represent a lower total ownership cost.